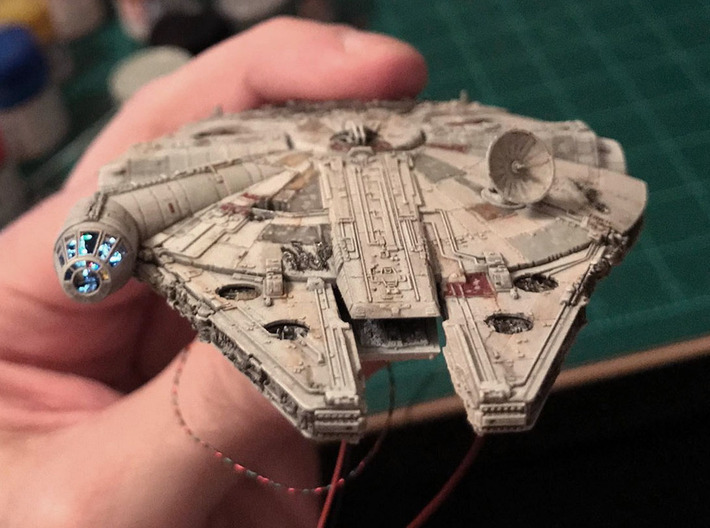
Here's awesome work by Ken Spriggs, using the cockpit cone and radar dish (note: it also shows the cockpit interior, which like the Bandai Falcon kit is NOT part of this set). For more info visit https://www.youtube.com/watch?v=JjVCZxbAPBc

Product Description
Bandai 1:350 Falcon. Set 1: the Outside Bits.
The Bandai 1:350 Vehicle 006 Kit is a pretty decent representation of the ANH (1977) Falcon in absolute miniature. But there are a couple things wrong with it. First, it has solid windows rather than open ones. And a few parts are TFA-style, rather than consistently ANH style.
This set aims to fix those problems, and includes the cockpit cone, the gunport windows, the radar dish, a choice of engine grilles, the dish mount, the curved rear sidewalls, the docking rings, replacement top circular maintenance pits, and other goodies.
Cockpit cone.
This is a direct replacement, and gives you a nice open look. Though it will take some cutting and filing to fit (what they call "fettling" in the UK), and will need epoxy or superglue/ACC. Because of the way 3D printing works, you will probably want to fill the stairstep lines and sand them carefully.
The window bars have been thickened compared to the prototype to make them a bit sturdier and printable. The subtle scalloping on the front surface is present, but hard to see because of the print resolution problem. It's easy to fix that with a flat file.
No provisions are made for glazing since the original ILM models lacked glazing, model glass always looks unconvincing, adding "glass" will emphasize how thick the bars are, and finally glazing makes it harder to see a lovingly detailed interior.
The cone is compatible with the interior detail that I designed.
Docking rings.
The Bandai 350 docking rings aren't very screen-accurate since they taper in too much and, oddly, have TFA detailing. It would have been a lot of work to make new parts with the correct profile, so I just fixed the biggest problem: I made new disc surfaces that don't have the extraneous TFA pipework. You will need to drill out the ring faces and file them carefully with a small half-round file to get these replacements to fit.
Gunport windows.
The solid gunport windows are tricky to replace since the prototype ones have such slender bars. I had to make thicker bars to get something printable, which does unfortunately limit views of the interior. No glazing, as above. The windows are designed to sit flush with the surface, unlike the incorrectly sunken Bandai ones. You will need to carefully drill out the existing solid windows to fit these ones. It's hard to get the hole perfectly round, so this may require a bit of putty to fill any gaps.
Dish.
Here's a replacement radar dish, since the Bandai one is a bit overscaled and unconvincing. It's made in two parts so you can glue it together at whatever angle works for you. I suppose in theory you could drill tiny holes and add wires and make it adjustable, but it wouldn't be easy.
Replacement maintenance pits.
The round maintenance pits are filled with TFA pipes and details. So I've included four replacement pits. I didn't make replacements for the underside four round pits, though, as you have to stop somewhere!
To install these pits you'll need to slice off the existing ones from the lower mandible section and glue them in. Not difficult, but fiddly.
I've also made a replacement upper octagonal pit, which is a tremendous amount of work to install and probably not worth the hassle! But this version is slightly more screen accurate than the Bandai one.
Engine grilles.
The engine grille has a grid that approximates the SE version of the engine. It does not have the same number of openings as in the film, for the simple reason that the Shapeways 3D printers can't produce fine enough bars. Sorry about that.
Curved sidewalls.
The Bandai straight sidewalls are correct and have the OT 1977-era details. Awesome! But for some reason they didn't bother to correct the curved sidewalls, which have the TFA detailing. So I've made proper versions. Note, however, that they are really fiddly to fit properly - this will take some filing and sanding and gluing.
Cannons.
The 1:350 quad cannons are a bit too TFA looking for my tastes. I've supplied slightly more screen accurate versions, but since they're so tiny they had to be really oversized. I also had to put connector strips to join the four barrels together to avoid breakage.
Cockpit tunnel ridge.
Finally, this is the most difficult part to install and many people may not want to bother. And that's the ridge that runs along the cockpit tunnel on the Bandai 1:350 and 1:144 models is totally wrong. The details are raised too high, and are incorrect. (the Bandai 1:72 looks to fix this)
So I've made somewhat more accurate ridge detailing, but it's very very difficult to cut the top of the tunnel and fit this part without making a mess. Only take this if you're really obsessed with accuracy and have the skills, patience, and time to do it, is my advice!
Please read the following if you're interested in these items.
These are accurizing components, not refined commercial products. They won't easily snap together like a plastic kit.
They're parts for the serious, yet fun-loving, hobbyist who wants to build a more accurate model. If you don't want to trim, sand, and glue - then these aren't the parts you're looking for!
Many of the the prints are delicate, easily broken, and so minuscule they push the limits of today's printing technology. The detail visible in the digital previews can't always appear in the final product - it's limited to the resolution of 3D printers. 16 microns may sound tiny, but the print lines are still visible.
To sum up, I made these parts for my own use. I've put them here for anyone else wants them, since I think they're pretty useful. But they're NOT for the inexperienced, the rushed, or those with unrealistic expectations of today's 3D printing!
November 2019 update: Shapeways' changing algorithms affect pricing quite a bit. But by sprueing all the parts and rearranging them I was able to drop the price significantly. However this does mean you have to cut the parts off each sprue/runner very carefully! This is brittle 3D printed acrylic here. Use flush-cut sprue cutters - side-shear cutters tend to break things.


