Tan Fine Detail Plastic


Bandai Falcon Docking Rings 1/144 #1, Blast Damage
Made by
Print With Shapeways
 Choose Your Material
 Choose your color and finish
$19.85
Have a question about this product?
contact the designerYou must be logged in and verified to contact the designer.
Product Description
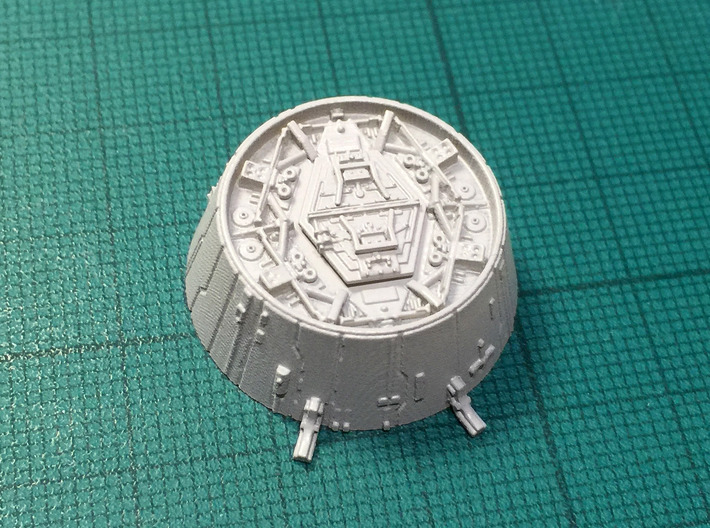
The Falcon has a pair of conical greebly-encrusted thingies on either side. No explanation has ever been given in a movie as to what the structures do, so people have come up with various theories over the years. Escape module launchers and docking bay connectors are two, but “docking ring” is a common enough name these days.
The Bandai 1:144 docking rings are so-so. They’re the right size and almost the right shape. But they have wide and overscale scribe lines on the cone, presumably for plastic moulding reasons. They have somewhat exaggerated (the central crossbar is too prominent) central disc greeblies based on the Force Awakens design. And they have angle brackets which don’t touch the octagonal back plate area.
There are other third party models of this part available, and I bought a pair. But it turned out they were worse, as they were nearly cylindrical, like the 32” Falcon. (the five footer had more of a truncated conical shape; something Bandai got mostly right) They also had solid triangular brackets, which annoyed me as that’s one of the first errors I remember fixing on the old MPC model decades ago.
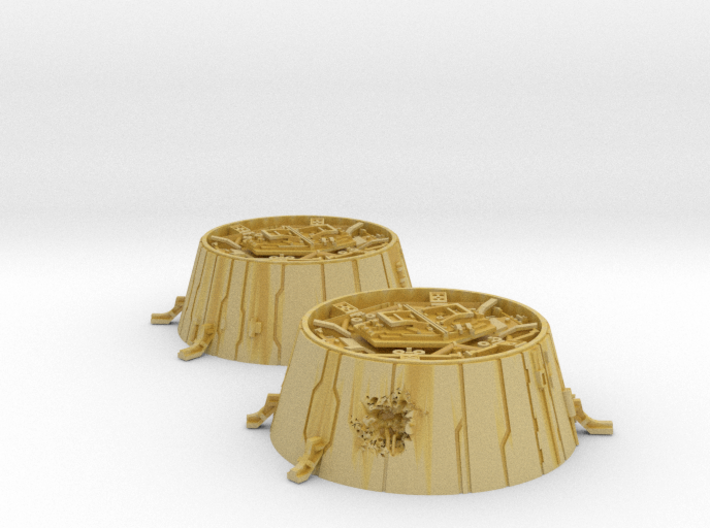
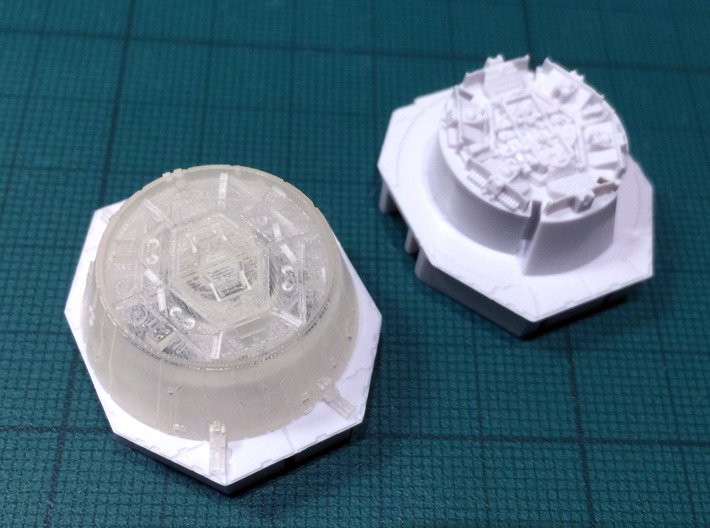
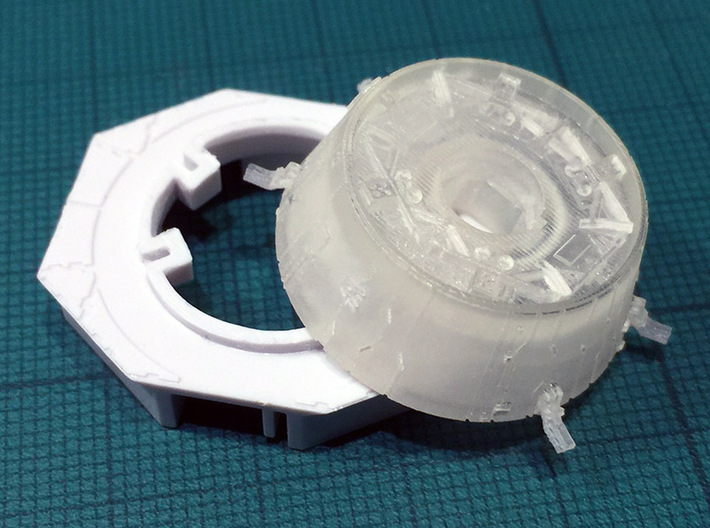
So I decided to make my own docking rings, accurate as possible to the Original Trilogy movie. I also decided to model the blast damage on the starboard ring, and make a version with separate hexagonal plates so I could install a pushbutton switch inside the ring.
Cones.
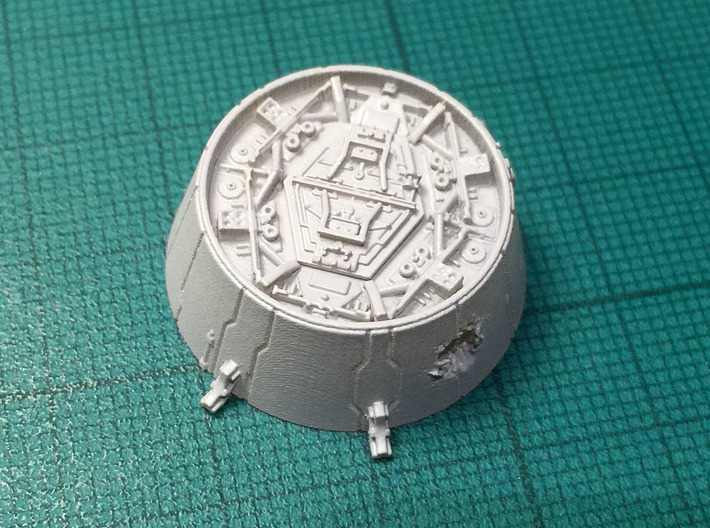
These truncated cone parts have straight angled sides, and don’t have the very slight curvature of the Bandai model. The side angles and sizing, on the other hand, precisely match the Bandai kit, since those aspects appear accurate to the original five foot miniature.
I have tried to match all the five foot greeblies and scribed panel lines correctly. Thanks to Joshua Maruska for his research into the panel line arrangement for this ship version! I also modelled the central plates after the original 1976/77 shooting model as much as possible. The Falcon model as it stands now is missing a lot of detailing from these areas.
Note that this product includes two rings – labelled P for port (radar dish side) and S for starboard (cockpit side). They differ in terms of scribing and side details, and also the length of the brackets since the starboard side has the ramp.
Note also that the shape of the part - a curved cone angling inwards - is a real problem for 3D printing technology. It basically means you're going to see some scalloped print artefacts from certain angles. These unavoidable curved lines can be minimized through light sanding, but it has to be done really carefully to avoid damaging all the fine detail.
Only the cones.
I didn’t model the eight-sided plate that fits behind the cone. The idea is to reuse the Bandai one since it’s just fine, but to do so you will have to saw off the supplied central cylinder. This is a bit fiddly to do and means installing these parts is not a drag and drop process, but also means you get to keep the Bandai moulding which holds that part of the model together.
Be sure to tape over and protect the flat plate before you cut. Use a couple layers of thick tape, as the edge of the saw blade can cut and damage the simulated hull plating if you don’t!
Triangular brackets.
The original five foot model has angled brackets joining the back plate and cone. These are made from Aurora Sealab parts in the original, and feature a triangular gap at the join. To model this gap I have made angled brackets with the correct open hole.
Blast damage.
The original model has a large hole on the lower starboard side, and I’ve tried to replicate that in this part. It’s not perfect, but it does simulate torn hull plating and internal wires or pipes. Once painted, with the correct black starlike streaks, it should look close.
This is a feature that’s not very difficult to replicate on a soft styrene part - just wield a sharp knife. But drilling and slicing through hard brittle 3D-printed acrylic plastic is much trickier. Hence building the damage into the part.
Versions:
I've made three versions of the docking rings in 1/144 scale.
Falcon Docking Rings 1/144 #1, Blast Damage
Falcon Docking Rings 1/144 #2, Pushbuttons
Falcon Docking Rings 1/144 #3, No Damage
I also have replacement sidewalls, replacement maintenance pits, and additional details for the Bandai 1:144 Falcon kits. Note that these parts are not designed to fit the FineMolds 1:144 Falcon, which is a different size!
Please read the following if you're interested in this item.
This accurizing part is not a mass-market commercial product. I made it for my own use, and have put it here in case it's of interest to someone else. Possibly you, since you’re reading this.
This is a component for the serious model maker who wants to build a more accurate miniature. It requires finishing. If you don't want to trim, file, sand, and glue, then this isn't the part you're looking for!
The part is tiny, and easily broken. It pushes the limits of today's 3D printers. The detail in the digital previews is all there, but it won't always be visible at the miniscule sizes that this scale requires!
The Bandai 1:144 docking rings are so-so. They’re the right size and almost the right shape. But they have wide and overscale scribe lines on the cone, presumably for plastic moulding reasons. They have somewhat exaggerated (the central crossbar is too prominent) central disc greeblies based on the Force Awakens design. And they have angle brackets which don’t touch the octagonal back plate area.
There are other third party models of this part available, and I bought a pair. But it turned out they were worse, as they were nearly cylindrical, like the 32” Falcon. (the five footer had more of a truncated conical shape; something Bandai got mostly right) They also had solid triangular brackets, which annoyed me as that’s one of the first errors I remember fixing on the old MPC model decades ago.
So I decided to make my own docking rings, accurate as possible to the Original Trilogy movie. I also decided to model the blast damage on the starboard ring, and make a version with separate hexagonal plates so I could install a pushbutton switch inside the ring.
Cones.
These truncated cone parts have straight angled sides, and don’t have the very slight curvature of the Bandai model. The side angles and sizing, on the other hand, precisely match the Bandai kit, since those aspects appear accurate to the original five foot miniature.
I have tried to match all the five foot greeblies and scribed panel lines correctly. Thanks to Joshua Maruska for his research into the panel line arrangement for this ship version! I also modelled the central plates after the original 1976/77 shooting model as much as possible. The Falcon model as it stands now is missing a lot of detailing from these areas.
Note that this product includes two rings – labelled P for port (radar dish side) and S for starboard (cockpit side). They differ in terms of scribing and side details, and also the length of the brackets since the starboard side has the ramp.
Note also that the shape of the part - a curved cone angling inwards - is a real problem for 3D printing technology. It basically means you're going to see some scalloped print artefacts from certain angles. These unavoidable curved lines can be minimized through light sanding, but it has to be done really carefully to avoid damaging all the fine detail.
Only the cones.
I didn’t model the eight-sided plate that fits behind the cone. The idea is to reuse the Bandai one since it’s just fine, but to do so you will have to saw off the supplied central cylinder. This is a bit fiddly to do and means installing these parts is not a drag and drop process, but also means you get to keep the Bandai moulding which holds that part of the model together.
Be sure to tape over and protect the flat plate before you cut. Use a couple layers of thick tape, as the edge of the saw blade can cut and damage the simulated hull plating if you don’t!
Triangular brackets.
The original five foot model has angled brackets joining the back plate and cone. These are made from Aurora Sealab parts in the original, and feature a triangular gap at the join. To model this gap I have made angled brackets with the correct open hole.
Blast damage.
The original model has a large hole on the lower starboard side, and I’ve tried to replicate that in this part. It’s not perfect, but it does simulate torn hull plating and internal wires or pipes. Once painted, with the correct black starlike streaks, it should look close.
This is a feature that’s not very difficult to replicate on a soft styrene part - just wield a sharp knife. But drilling and slicing through hard brittle 3D-printed acrylic plastic is much trickier. Hence building the damage into the part.
Versions:
I've made three versions of the docking rings in 1/144 scale.
Falcon Docking Rings 1/144 #1, Blast Damage
Falcon Docking Rings 1/144 #2, Pushbuttons
Falcon Docking Rings 1/144 #3, No Damage
I also have replacement sidewalls, replacement maintenance pits, and additional details for the Bandai 1:144 Falcon kits. Note that these parts are not designed to fit the FineMolds 1:144 Falcon, which is a different size!
Please read the following if you're interested in this item.
This accurizing part is not a mass-market commercial product. I made it for my own use, and have put it here in case it's of interest to someone else. Possibly you, since you’re reading this.
This is a component for the serious model maker who wants to build a more accurate miniature. It requires finishing. If you don't want to trim, file, sand, and glue, then this isn't the part you're looking for!
The part is tiny, and easily broken. It pushes the limits of today's 3D printers. The detail in the digital previews is all there, but it won't always be visible at the miniscule sizes that this scale requires!
Details
What's in the box:
Falcon Docking Rings 1/144 #1, Blast Damage

Dimensions:
Success Rate:
First To try.
What's this?
Rating:
Mature audiences only.


