
Whether you are creating something for yourself or designing something beautiful for your customers, making your product come to life is incredibly rewarding. 3D printing has continually lowered the barrier from having an idea to actually holding your product in your hands.
Ensuring your 3D model can be printed, and understanding how design and material choices impact how you make your model can however be challenging. The team at Shapeways constantly strives to make that easier, so with the new year, we’re thrilled to introduce a suite of 3D tools to empower you further. The Shapeways 3D tools give you more transparency into how we check your models and to help you check, visualize, and fix potential issues yourself before purchasing your model.
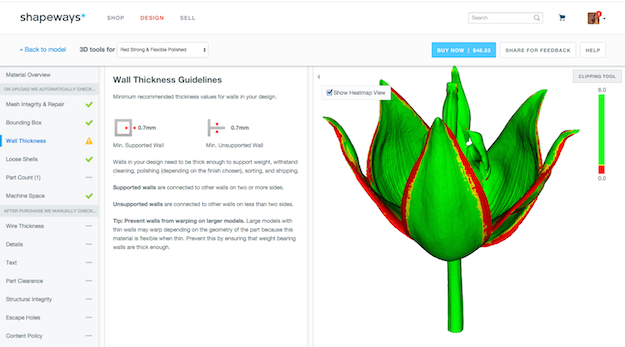
With the success of our wall thickness fixing tool in March of last year, we were inspired to invest in expanding the ways you can view your model against what our 3D Printing Engineers at Shapeways are looking at when you upload a model – our material design guidelines. So we built 15 tools that let you view your model against our material-specific guidelines: mesh integrity and repair, bounding box, loose shells, part count, wire thickness, details, text, part clearance, escape holes, machine space, weak geometry, texture, interlocking parts, our content policy, and improved our wall thickness tool with a heatmap view.
Each tool enables you to view your model against our design guidelines and clip your model along the x, y, and z axis for x-ray vision so you can identify any potential issues faster and with confidence.
Our tools are grouped into two types: ‘On upload we automatically check…’ and ‘After purchase we manually check…’ Our wall thickness, bounding box, mesh integrity and repair, loose shells, and part count tools in the first group have automatic checks that will show you a green check, yellow warning sign, or a red ‘X’ indicating our initial level of confidence that you will pass that check upon manual inspection post-purchase. Every automatic check is still subject to a manual check post-purchase.
Machine space, loose shells, and wall thickness tools will also visualize any detected issues on top of your model. The improved wall thickness and part count tools offer ‘fixes’ to change your model related to the issue in the tool in addition to a heatmap view. You can also ‘sintershell’ a multi-part model in the part count tool, which encloses your parts inside a mesh, making it easier to handle and sort. Adding a ‘sintershell’ can sometimes reduce the labor cost of a multi-part model.
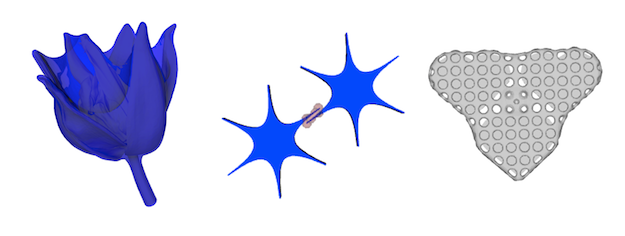
Machine Space Visualization, Loose Shells and Sintershell example
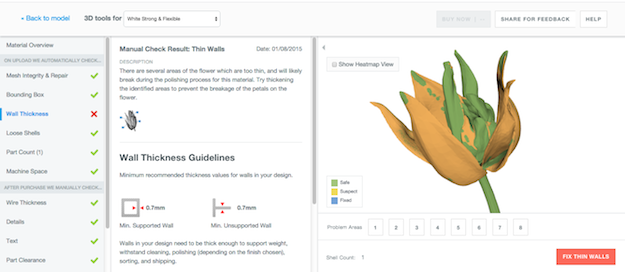
These tools are not only helpful before you purchase, but also after you purchase if your model gets rejected. If your model is rejected, you will receive the email with the detailed information explaining why, as always, but it will be viewable in our 3D tools right next to your model, and directly above our design guidelines – so you can see all the information you need to take action to fix and re-upload your model.
We hope that you’ll be as excited by these tools as we are and find them helpful as you design and get ready to 3D print. Upload a new product and read the 3D tools Tutorial or check out 3D tools with your existing models. This is just the beginning of the 3D tools so we’d love to hear about how you are using them, what you find them helpful for and if you have any suggestions. Post a comment or head over to the forum to tell us what you think!
That all looks really useful, thanks! Any chance of a print orientation option though? Even with all these checks models are often “ruined” during the print process as you orientate them in odd ways which destroy details on FUD etc.
Good idea Mark! Print orientation is not something we currently offer but I’ll suggest it for the next round of tools. Thank you!
Would be great if you could prioritize print orientation as it’s something that’s asked for over and over again on the forums. Surely it should be easy, just a set of three radio buttons so we can state that either x, y, or z should point upwards during printing?
Hi Mark, I apologize I should have been more forthcoming. We do know that many of you want Print Orientation and unfortunately with the way we fill our machines it is not as easy as adding an option to select x,y or z up. . It is not an easy feature for us to build since fixed orientation might affect our ability to optimize print runs and therefor increase the costs for everyone. We are very keen to help you with this feature, but have not found the best way to do it (yet).
So awesome! Thanks SW team!
Glad you like it Dan!
Looks amazing!
Fantastic!!!
Great Piece of work you guy are doing! to shape the future! knowledge oriented site!
Cheers!