

Written by community member Daphne Laméris, and you can see her key sleeve here.
ShapeJS, ever heard of it? I did, but it took me a long time to actually look at it and try to understand it. The whole idea of using code to model a part looked really hard, and is not what I am familiar with. I can use SolidWorks to model, tried Blender twice and Rhino once. In the end, I always stuck to what I knew, SolidWorks. It became time to step out of my comfort zone and try something new.
The great thing about 3D printing is the option for mass customization. For a lot of designs, I already use the co-creator options. This way, I can offer rings in difference sizes and a key sleeve that can be adjusted in size and with text. But every order still takes time to make and that order cannot be produced until I make the model. Therefore, I looked into ShapeJS.

With ShapeJS you can use javascript to make models. Numbers and texts filled into textboxes can be used as parameters in your code. For my key sleeve, this could be the diameter of the key and the key thickness. For a better explanation you can check out the Shapeways.com shapeJS introduction.
So I set the goal to make my key sleeve in ShapeJS. It is a simple shape that needs multiple values of the user as input. The first problem is that I had no experience whatsoever with javascript before I started. Luckily, there are some examples available as well as some text. I read all the text and look at all examples, not understanding most of it. But I changed some values in the examples and saw what it did. Especially the example with the picture is fun, it’s easy to just upload a photo and see what it does. The next step was sketching the key sleeve. How could I build my design from simple shapes with the Booleans? The original key sleeve was made with SolidWorks. Using code is a different way of modelling. It still works with solids, but you can’t make a sketch as with SolidWorks (well, at least not that I’m aware of). So I wrote down what the code should do:
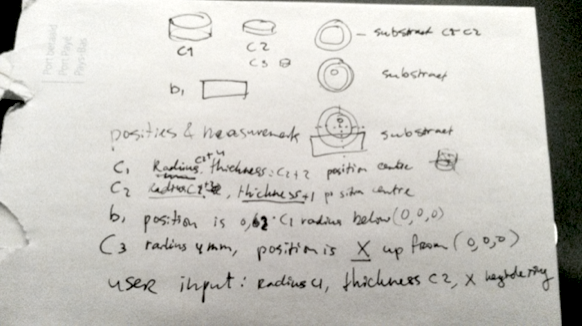
The picture above was a first rough sketch (made without the intention to show it to anyone else, this is often referred to as “pseudo code” where you write out in plain words what you want to code to do and in what order). I wanted a hollow cylinder by subtracting a small one from the big one. Next a part should be cut out – this is the opening for the key. So I need to make a box, give it a position connected to the key radius and subtract it from the hollow cylinder. The design also needs a hole for the key ring. The position is determined by user input as well as the size of the hole. Finally, the key has some text that needs to be on the front. With this, I had my recipe for what I wanted to make. And then I realized I did not know what my ingredients were. The examples showed how to make a box, but how to make a cylinder? I couldn’t really find a list with explanation of all shapes and functions that would be useful for modeling. I did find more examples, and from that I used the cylinder. I’m not going to describe every step I took to create my model. But I can tell you how it went globally: like creating Frankenstein’s monster. Copy here, paste there. Use a part of this example, use a part of that example. Adjusting things to see how it works. Deleting stuff if I didn’t know what it did. If the script stills runs, okay. If not, put it back. It’s not a sustainable approach for creating very complex shapes, but it is a great way to learn new stuff.
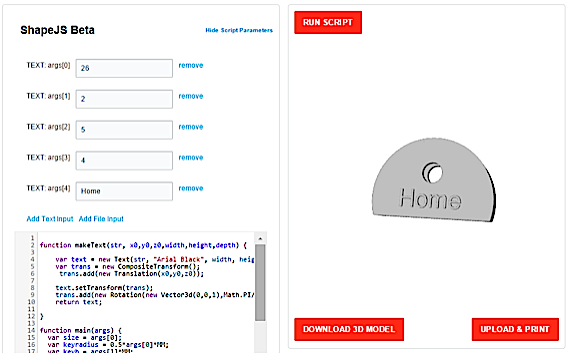
In the end, it worked! With the set input from the user (key diameter, key thickness, keyhole diameter, distance keyhole to top) a key sleeve is created. It took most of my Sunday afternoon and evening (and a bit of my Saturday). Next step is getting in the ShapeJS co-creator pilot so this could actually be used for sale. And then it’s time to learn and create more!
Hhm… so we’ve spent the last few decades getting to the stage where we can click and point on a screen to design something and now we’re regressing to writing, testing, writing, testing code again? No, thanks, those days are gone to me, when I taught myself BASIC programming and was eventually creating 3D rendered images in POVRay – line by painful line….
To each their own, and I don’t knock anyone for trying something new, but, no, this just sends shivers down my spine!
Well, if you know a way to use a CAD program to design a product that can be customized by customers through a website without code, please let me know 😉
Different strokes for different folks Glen! Some people like to code, others like to draw, and both can end up with a 3D model. While CAD software has indeed gotten much easier in the last few decades, ShapeJS allowed Daphne to create a CREATION TOOL – and that (used to be) much harder than raytracing! 😉 With all your knowledge, I bet you could make some amazing things with ShapeJS – why not give it a try?
really! welcome back to 1985.
Programming never went away – how do you think that screen you’re pointing and clicking on does its magic? Someone, somewhere told it how to react.
The advantage of ShapeJS is pretty much the same – people who can’t 3D design themselves (or just don’t want to spend the time) can get customised stuff just by entering their parameters.
The simple fact is that, while GUI’s are fantastic time savers most of the time, you are limited to the features that the coder(s) who made that program gave you. There have been a number of instances, for example, where I’ve saved myself *hours* of work in Photoshop with a single-line ImageMagick script that did its job in *seconds*.
Very cool! I use OpenSCAD which is also a programming language. Javascript is not my favorite language, but then again neither is OpenSCAD.
I would guess that the text is the hardest thing to do, at least it is for OpenSCAD.
For making complex precise objects defined by mathematics, coding seems to be the way to go. On the other hand more organic, artistic objects are best designed using a GUI. I like having both, but almost all the stuff I make is of the former variety.
ShapeJS could become mainstream if it would be offered as an export option for Solidworks, Sketchup etc. instead of STL.