
A few months ago, it became really clear to me that the Shapeways community was not satisfied with the quality of Full Color Sandstone. It was clear that something needed to be done, so Nancy and I set out to find better alternatives.
Since the community’s feedback was the catalyst for reviewing Full Color Sandstone, we decided to ask for help of some special testers within the community. We reached out to Stony Smith and Magic, and we were excited when they agreed to help. Stony and Magic sent us a couple of their models, which we printed in FCS using 3 different methods. They both wrote up a review comparing the 3 different methods. We are continuously improving and looking into better ways to produce. This time, we are developing by enlisting the help of our community in the research process.
This is the second installment in the review of Full Color Sandstone, initiated after active community discussions over the previous months. You can check out the first review here, by Magic, one of two community testers for this project. The second review by Stony Smith is below. So take a look, let us know what you think, is this something you would like to see as an option on Shapeways?
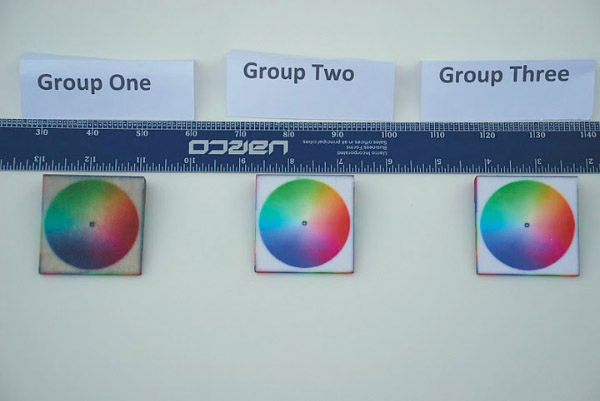
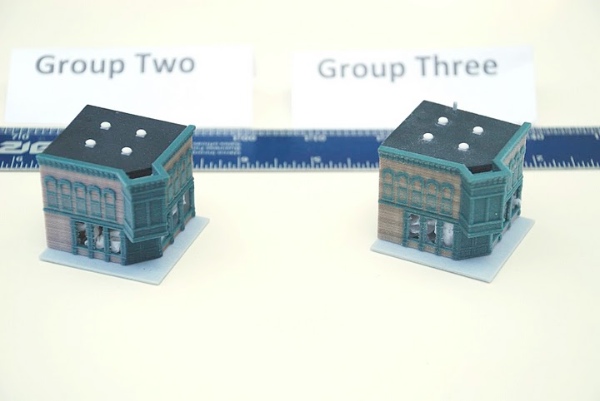
I am very impressed with the new FCS tests. The color is more vibrant, bleeds significantly less, and the background is whiter. It even seems to be a darker black. I’m not quite sure that I comprehended the two finishing methods. “Group 3” was a slight bit pale compared to “Group 2”.. what is the labor difference between them?It’s also incredible to see this level of details in FCS. For some model train people, there is a humorous “Three Foot Rule”.. if the object is three feet from you and you can’t tell the difference, it’s “good enough”. <grin> The new level of detail is definitely within the three foot rule. I Not to ignore the point, the surface finish is still coarse, but it is still VERY usable.I have yet to try a strength test against the material.. I hate to shatter such quality items.
A couple of observations:1) When photographing this stuff, little white flecks show up in the photograph that aren’t as noticeable during direct observation. Some of it may have to do with the intensity of the camera flash. Some of it may have to do with reflectivity of the wax coating. It affects what you would preview to customers, but looks “okay” up close. It almost seems that some flecks of the pure-white material get stuck to the model after printing.2) Working with the program that I am using, I can’t quite tell how the surface bitmaps are going to turn out.a) I was trying for a “brick” exterior on my model of a store, and the jpeg bitmap didn’t turn out correct. I’m not sure how to fix that. Some of it may be the program I am using (TrueSpace), but it’s something that will have to be comprehended for a creator to be successful. Note: It also didn’t match what I see using a VRML renderer in a browser. Note:: The SW preview of the model isn’t working either.b) On the ClockFace I had printed, the reverse side of the disk has the reverse image. Again, not sure that my software did the job correctly.. I need to learn/understand that better.c) I know that some programs apply colors (and images) using two different methods: PerVertex and PerFace.i) It would be good if there was a tutorial somewhere on the difference between them, and how they apply to the new FCSii) It would be even better if we could get a white paper from the printer manufacturer on how these methods are handled by the printer itself.3) On the Store model, I have a couple of “alignment pins” that are in the correct position for printing in WSF or WD, but with FCS, I should have included a bit more extra gap tolerance for it to sit down properly.Also… I “promise” not to try the 0.3mm walls again. <GRIN> At least not on a regular basis. Yes, it sort of “worked, but that’s what we have FUD for. Now, if you could only do color on FUD… <grin>As you well know, my interest at this time is largely in model trains. The closer you get an object to the rails, the better/finer/smoother you need the details to be. FCS is never going to work for the sides of a boxcar or locomotive. It WOULD work very nicely if someone is making coal/ore loads to go IN a gondola car…. hm…Ratings for new Full Color Finishes (from 1-10)Whiteness/Color Quality: 9/10Precision of color (does it bleed?): 9/10Durability (is it easily scratched/broken?): 6/10Touch/Smoothness: 7/10


Stony has been a programmer for 37 years. His primary interests are AI, 3D, and model trains.. he has worked with 3D software as a hobby since he was first introduced to the computer. Until a few years ago, it had always been rendering only, but after creating a few test models with OpenSCAD and uploading to Shapeways, to start designing items for his model train layout. With a bit of encouragement (elbow twisting) from friends at www.zcentralstation.com, he’s become a prolific creator in the (Z scale) model train community.
Great… the colour was really kind of crappy on the old methods so please do start offering this! But… no higher detail/thinner wall prints? Or did I misread? Stony menioned 0.3mm walls?
The wall thickness is my biggest issue with the full colour prints.. it makes it so I have to make all my models “blobby/chubby” and makes all prints much more expensive since it is quite hard to hollow them out well.
>Stony menioned 0.3mm walls?, so I sent her three models. It’s unable to structurally support itself.
When Nancy asked for samples, she said “no rules”
– the Clockface was done at 3mm
– the Store was done at 1mm
– and (not pictured) was one of my FUD models at 0.3mm. Let’s just say 0.3mm is not a good idea
Hi Dolf, with this process it is possible to do thinner walls, but the labor and care that goes into it would really raise the price anyway. One option for those who have small walled models, is to have a premium FCS which allows for super thin walls, but it would have to come with a really high labor fee (somewhere in the $20-30 range). From your comment about prints being expensive, I guess that alternative would not satisfy your requirements either?
Well… actually I think I may be prepared to pay something like that… In the end it’s my customers who pay those fees, not me personally… If it really means we can get walls as thin as WSF for instance. For me higher detail (even if you can only half the minimum wall thickness) is more important. Any improvement in that area is more than welcome! Second is price… third is the colour. I don’t mind smudgyness for my artistic uses.
Finally… Well done Nancy!
If the community is to go back and use shapeways for full color sandstone the quality , minimum thickness and price should compete with the competitors.
I might upload my famous iPhone Apps Coasters which i deleted.. after customers complaint about quality and high cost.
Btw, the competitor i’ve used has a finishing process which makes the model very very smooth – any news on that? (they say on their website that its the result of the superglue coating)
Shapeways 3D Printed Full Color Sandstone just got a whole lot brighter thanks to a change in our post processing. Full color 3D prints will now have whiter whites, brighter colors, greater contrast and definition.You have seen the beautiful results from
I have posted a couple of hi-res photos of the clockface in this forum thread:
http://www.shapeways.com/forum/index.php?t=rview&goto=34436#msg_34436