
Attention all SolidWorks users, following is a quick tutorial on how to export in Full Color from SolidWorks using a VRML file. The process uses the built in ‘appearance’ colors not any sort of image mapping so it is a relatively basic and easy process.

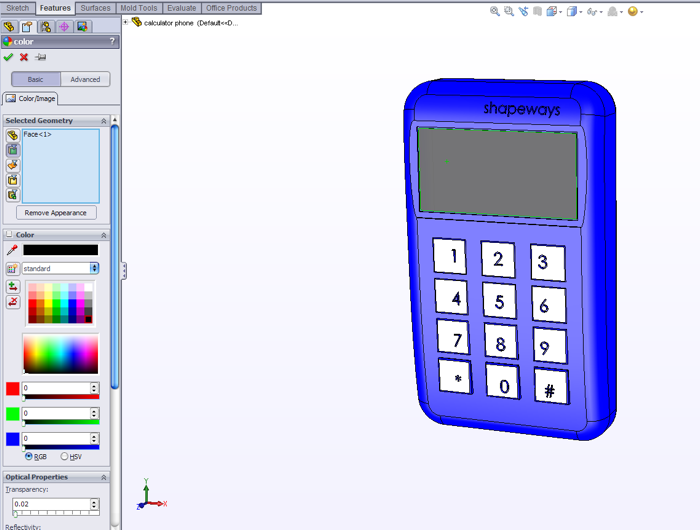
Step 1. Fire up SolidWorks and open or create a Part file. I have chosen to model a very clunky calculator looking telephone type object.
Step 2. Go to Photoworks>Appearance and in the sidebar you will see a dialog with color and mapping options, so you can select an entire part or just a single or multiple component such as faces. Repeat this process using surface selection to color up your model. Using darker hues in recessed areas may help to give the model more punch, you could also do some tricks like extruding really shallow text on a screen then coloring the text different to the screen to imply a digital readout.

Step 3. Once you are happy with the overall coloring of your model, you will need to scale it down to prepare to export as a VRML. Select Features>Scale and scale about centroid, uniform scaling at a rate of 0.001. This is because the VRML file reads any units as meters. (handy)

Step 4. Convert the file to VRML by Save As>VRML ensuring in the Options that you select VRML .97. Now you have saved the file you only need to upload the VRML file to Shapeways, you do not need to indicate the units as VRML are always in meters. You are now ready to order your full color 3D print colored using SolidWorks.


If I can figure out a way to include decals and material mapping I will be sure to let you all know, and don’t forget the Shapeways Add-in for SolidWorks to upload your files direct to Shapeways.
![]()
Brilliant Duann, have been looking for this info for a while. Thanks!
Hi Sandy,
Thanks, it is surprisingly easy.
As soon as I figured out the full color I thought ROBOTS
Would bee cool to see some of your robots full color 3D printed.
Cheers
Duann
I’m totally going to do that. STAND BY FOR ROBOT INVASION etc.