
SolidWorks users can now upload their files directly to Shapeways thanks to a proprietary add-in developed by Design Solutions and Shapeways, making it easier than ever for SolidWorks users to turn their 3D designs into physical objects.

SolidWorks users simply need to download the free BETA add-in from Design Solutions:
1) Install the Shapeways add-in,
2) Open a model in SolidWorks,
3) Login to Shapeways, and
4) Save to Shapeways.
This will automatically convert the model to STL format (as defined by the user settings in SolidWorks) and upload it to “My Designs” in your Shapeways account. The tool will also prompt users to enter any tags, provide a description and select whether the model is for sale or display only.(you will need to agree to Shapeways terms and conditions on the Shapeways site once it is uploaded).
As mentioned this is the BETA version which should be replaced with the second iteration in 6-8 weeks so please do provide us with any feedback you have in this time so we can improve the add-in so we can use this to improve functionality.
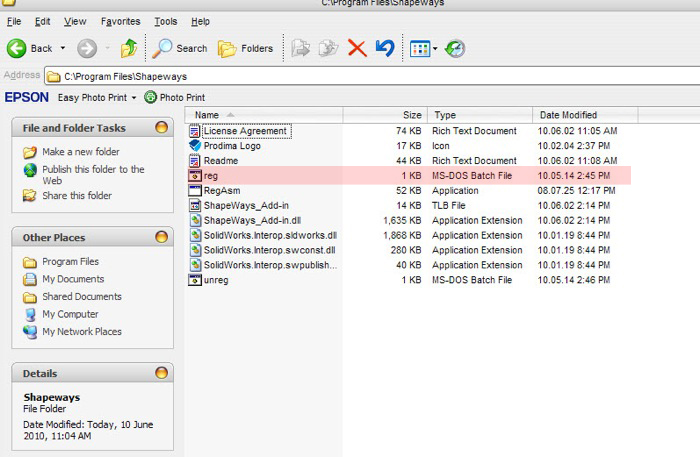
Step 1. Download and the add-in from Design Solutions for either 32 or 64 bit and run the installer.
You will need to make SolidWorks is NOT running and then run the reg.MS-DOS Batch File in the Shapeways Folder now installed in your Program Files.
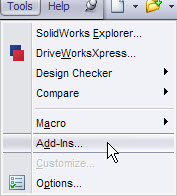
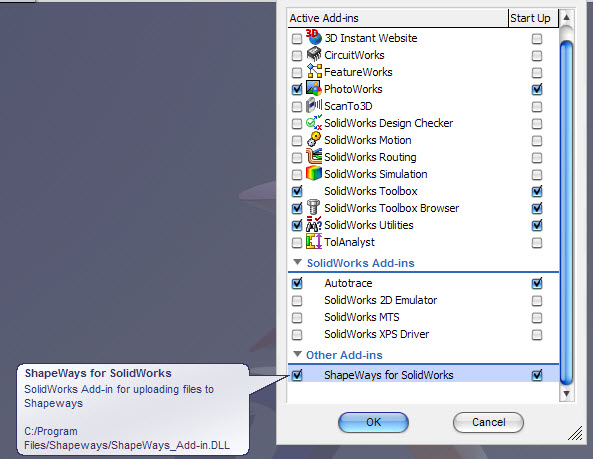
Step 2. Now you can boot up SolidWorks select Tools>Add-Ins then scroll down and select Shapeways for SolidWorks. If you tick both the Active Add-Ins ans Start Up then this add-in will be ready to go every time you fire up SolidWorks.
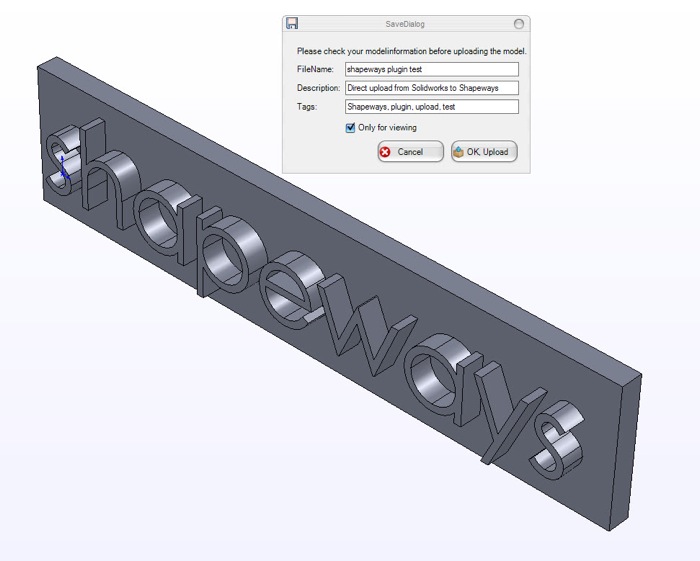
Step 3. Open or create a SolidWorks Part file (I will discuss a workaround for assemblies later) making sure it is a solid body part as surfaces will not be uploaded. If there is a combination of surfaces and solids in your part, only the solids will be uploaded, if there are only surfaces you will not be able to upload.

You will be asked to log in to your Shapeways account using your user name and password. (You should only need to do this once per SolidWorks session, If you don’t have a Shapeways account, go to register with Shapeways). From there you will be prompted with the Save Dialog where you can enter File Name, Description and Tags, along with whether the model is ‘only for viewing‘ (not for sale).
You will get an upload successful dialog box followed by the usual emails from Shapeways confirming your upload then either informing you it is ready to print, or the dreaded ‘there is a problem’…
Step 4. Once you have uploaded all of your SolidWorks files you can then log into Shapeways to see them in My Designs, here you will need only to confirm that the design is your work, and that Shapeways is granted license to print the model as per usual Shapeways terms and conditions.

EASY….
A few side points to consider:
IF you want to upload a SolidWorks Assembly simply Save As a Part File specifying All Components (exterior components may work with the loss of data and exterior faces did not work at all for me) then use the Shapeways Add-In to upload it.
The Shapeways Add-in applies the users STL settings to generate the file uploaded so if you need to decrease your poly count adjust there as usual.
The STL file is NOT saved anywhere on your computer, if this is an issue for some reason you will have to do this manually.
Please do give us feedback on the functionality, if you come across any issues, we will be looking to update it in six to eight weeks. Also this has not yet been tested in any student edition where I doubt that it will work (but very happily proved wrong).
![]()
Now that the Shapeways Add-in for SolidWorks allows users to upload their files direct to Shapeways, now is also a good time to give a quick tutorial on how to export in Full Color from SolidWorks using a Zipped VRML file. The process uses the built in
Does this work in any older versions of SW? Such as, say, 2007 SP3?
Tried it SolidWorks Student Edition 2010-2011 and got a successful upload on a single part file–did not try anything more complex than a big solid rectangular box yet.
WOW, that bypasses the solidworks student restriction..
How cool!!!!!!!
if you make assemblies then save them as a part you should be able to do complex parts
Thanks for letting us know!!!
I can’t install the add in. I am using Solidworks 2011 Premium Edition 64bits.
I already downloaded the 64bit version of the add-in instaled, run the reg.MS-DOS Batch File.
But the add-in don’t show in the add-in list.