
The DAVID 3D scanner is do-it-yourself 3d scanning kit. It uses a line-laser, a webcam and the DAVID software to ‘read’ the depth information of a scene. Once you’ve made multiple scans of an object, it can stitch them together to get a to get a full 360 degree scan.
The cool thing is that you can use the basic DAVID scanning software for free (albeit limited in resolution). The stitching software (‘Shape Fusion’), though, is commercial and is included in the professional version of the software which starts at € 199,-. So if you have a decent webcam and a line-laser (which you can buy starting at € 19,- in the DAVID shop), you can start experimenting with 3D scanning on a *really* tight budget.
 I was curious to see how well this worked and if the scanned models would work with Shapeways, and requested a DAVID starter kit for review. This kit sells for €399 on their website, and contains everything you need to scan and stitch your objects:
- Several calibration panels (for different scan sizes).
- A red line laser, battery operated with adjustable focus.
- QuickCam Pro9000 1600×1200 webcam including a stand.
- A USB Stick with software.
- An extensive manual.
- Monkey not included 😉
Getting started
Installation was easy enough if you follow the manual step by step. The main things to do are to install the webcam drivers, and install .NET 2.0 if you haven’t already. The software itself runs off the USB key (which functions as copy protection) and requires no installation.
The manual I received was in German by the way but I’m sure that was just a mistake. I *was* a bit disappointed though that only after my tests I found out about their excellent on-line manual that contains much better information than the printed version! (You’ll find the link at the end of this article).
Mac users
I immediately ran into a snag: the DAVID software is Windows-only and I’m a Mac user. Fortunately I can run Windows under VMWare Fusion which did a great job in recognizing the webcam and USB key. The performance was acceptable on a MacBook Pro, although my system wasn’t powerful enough to use the camera at the highest resolution of 1600×1200 pixels at a reasonable speed. Therefore, the resolution of my scan is probably not the optimal result that you can achieve with DAVID.
Calibrating the system
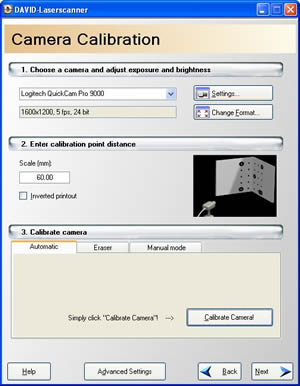 Before you can start scanning, you’ll have to teach the software about the environment you’re using. This is easy as it’s all done automatically during the ‘calibration’ process. First choose the correct calibration panel; there are three panels for different scan sizes. Use the one that matches the size of the object you want to scan.
Now start the calibration and everything will be taken care of. I did find that during my initial tests the system had trouble to calibrate correctly, but the manual explained how to fix this using some manual corrections on the calibration image.
The system now knows all it needs to know about the lens and the setup to create ‘absolute scale’ models.
After the software is calibrated, do not touch the camera or calibration panels anymore! If you do, you’ll have to start all over.
Tip: If you don’t have calibration panels, you can make them yourself!
Running the scan
Scanning is easy but time consuming: you ‘brush’ over your object with the laser line. At the same time you see the contour lines appear on the screen, and you can keep going until you feel that you’ve scanned in enough points to get an accurate render of your object.
Once you’re happy with the result you save the scan, rotate the object by 45 or 90 degrees and repeat.
I found that creating a good scan takes about 5 minutes per step – I’m guessing that on a faster computer this might be a bit less as it would be easier to accurately scan small details.

Stitching the scans
During the stitching phase you align the separate 3D scans. Again, the software is quite clever. Most of the time, you’ll only need to select two scans and watch the software move them about until they match (this is a lot of fun to watch, actually!).
After alignment, the object still looks messy: it has some outliers and holes in them. This is where the ‘Fuse’ step comes in: it’ll smooth the surface of your object and close all the hole in the surface. And here’s where the REALLY good news comes in: *Fuse creates watertight or manifold objects!* Yes, you can upload these models straight to Shapeways! Awesomeness.
You can download the resulting model here.

Conclusion
I love it! There you have it. And I’ve seriously considered NOT to return my review unit to DAVID 😉
Having said that: don’t expect a magic wand: scanning your object takes serious time and effort. You’ll be spending a LOT of time in a dark room tweaking the settings and laboriously sweeping a laser-beam over your objects. After a while it’ll get easier though and you’ll get a feeling for how to set everything up. The scanner won’t be able to scan every object to throw at it: highly reflective or transparent objects are difficult, but you can solve that by spraypainting or powdering them.
I also found the software a bit on the technical side and not as user-friendly as it could be. It gets the job done rather well though, so this is not too much of an issue.
Did I feel that the DAVID Starter Kit is good value for money?
Receiving all the required equipment is very convenient (especially for busy people like me), and I especially appreciated the ready-to-use calibration panels. If you want to save yourself some money you can print these out yourself though and buy a cheap webcam and focusing line laser on the web – that would probably shave off about € 100,- of the total kit price.
The scanned result was impressive enough and I’m sure it could be further improved with more practice and a computer that could actually use the high resolution of the webcam.
Count in Shape Fusion’s ability to generate ready-to-print models for Shapeways and I’d say this is a definitive must-have for designers who are into 3D printing.
Related links
It should be noted that, if you do not want buy the € 199 shape aligning and merging tool, you can perform the same tasks for *free* with *MeshLab* .
Moreover the surface reconstruction algorithm inside the David sw tool it is (as reported by the David authors) the same of MeshLab, based on the Poisson surface Reconstruction algorithm that was kindly provided to the community by Michael Kazhdan and Matthew Bolitho under a very permissive BSD licensing (thanks Michael and Matthew!),
@ALoopingIcon: really? I wasn’t aware that MeshLab had a mesh alignment/stitching module nowadays. That program keeps amazing me 🙂
Still, there €199 package will also give you higher-resolution scanning, so if you’re serious about this, it may be worth considering.
Here’s a $395 kit I’ve been eyeing with interest. It comes with a laser stand and motorized base to automatically rotate the model for you, saving you alot of hassle. I haven’t ordered it yet, as I’m still not too sure I need it. I’m pretty good at building stuff with photos by hand.
TriAngles 3D Scanning Kit
http://www.intricad.com/technology.html
The only problem I have is making human faces, and this item is too slow for real-time capture. Unless the person is dead, their breathing alone would mess up any slow scan. I need to find something REALLY fast, and really cheap for doing faces.
Ever tried to make a mold with alginate or silicon? So you could scan faces…
I don’t want to capture a blank, unmoving face. I want to capture a living face, in real-time.
First off, plaster casting somebody’s face displaying emotion would be hard to pull off under the best circumstances. Sure, you can adjust the model in the computer later, but it wouldn’t be as realistic.
Secondly, just applying the plaster alone is a long, messy, and uncomfortable process. I’d like to make scans of people’s faces instantly and turn those scans into busts and other sculptures. Something where anyone could sit down, smile, frown, look goofy, and in one-second, have a model of their head and shoulders.
I know there’s plenty of expensive ways to do it, I’m just looking for a more affordable method.
Discovering this DAVID scanner software and then doing some more research on the web did actually lead me here to Shapeways about a month ago. I just now recieved my first print and will write a review in the forum later.
Great! Please do share your results, thanks!
Hi there.
I’m very interested in experimenting with 3D scanning, and then printing my results with shapeways. Seems you’re way ahead of me and I was wondering if you could please advise me as to what software and tools I should choose- there seem to be a few on the market. Did you use the DAVID software? If so, was it the free trial version or professional? Any help or advice would very much appreciated!
-David Krulik
davidkrulik@gmail.com
Is there a possibility for the Shapeways team to offer the scanning package to their users under a discount price (perhaps make a deal with David Systems)?
Every Shapeways designer should use 3D scanning in combination with 3D printing on your site!
Hey Guys, this David scanner is quite ok. But if you ask me I would prefer an nextengine desktop model. Works very good for us to scan small but detailed objects. Gr Edward
Thank you for the informative post. I was wondering if you could help me, I’m looking for a 3d scanner that can process dies, casting, forging, sheet metal and molded plastics part production. I was told to go to: 3d scanners but are there other options?