
Last month, we launched Wall Thickness Visualization to help you see areas where your model might need improvement to survive 3D printing, and now we help you fix them. Wall Thickness Visualization identifies weak points in your models with areas below our recommended wall thickness guidelines.
Wall Thickness Fixing is an add-on to the Wall Thickness Visualization tool that actually thickens walls to the minimum recommended wall thickness for the material you’re working with. You can click ‘Save and Exit’ to apply your fixes or Download the fixed model files for use in your 3D Modeling software.
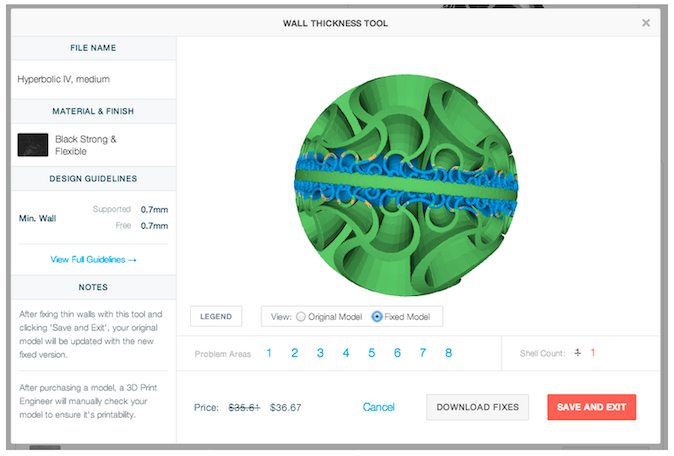
Excited? Check out this example of a model fixed with Wall Thickness Fixing:
Before:
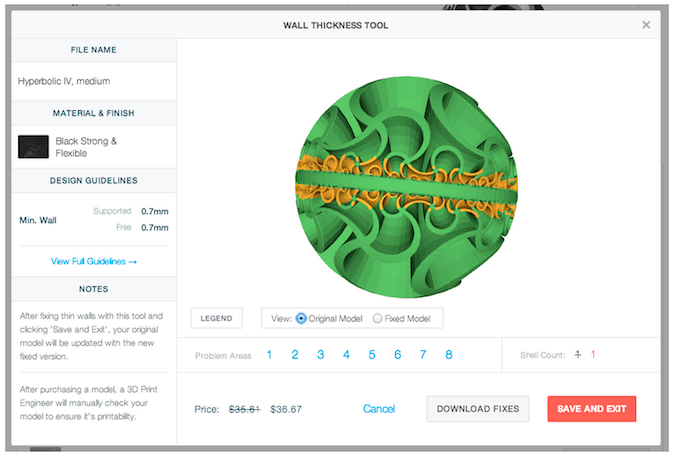
After:

Are you drooling over those screenshots? Here’s how you can start fixing your models:
1. Upload a model to Shapeways or view the existing Model Edit page.
2. Look for any materials that have a ‘View Thin Walls’ warning (this can take a few minutes)
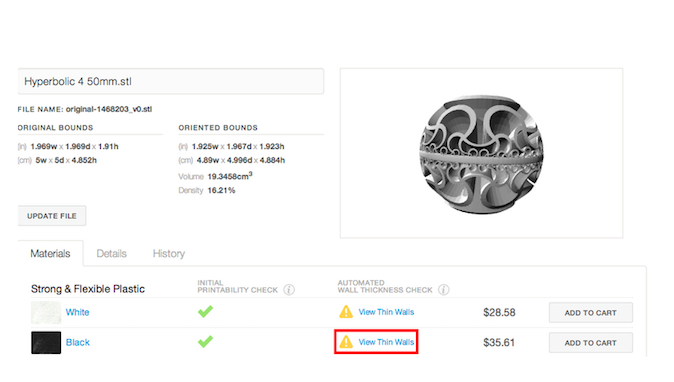
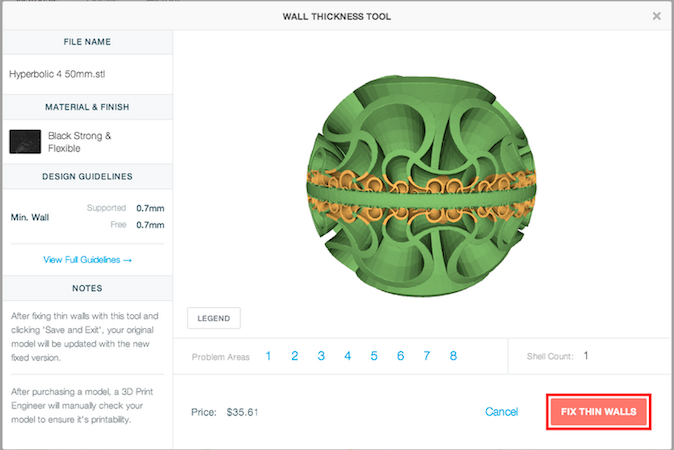
3. Click on the ‘View Thin Walls’ link
4. Click ‘Fix Thin Walls’ to generate the proposed fix geometry (this can take a few minutes)
5. Preview the proposed changes highlighted in blue

6. Choose one of three options:
1. Calibrating the checking process – Currently a person checks every model that comes in to ensure that it meets our design guidelines and thus should be manufacturable. We’re now comparing results across different checkers to ensure that our 3D Printing Engineers are consistent in how they locate and find problems.
2. Giving you more transparency into what’s happening with your order – We’re starting to surface more information about what’s going on with your design and how it handles each step of the manufacturing process, from printer to post-processing, to shipment.
3. Building better automated tools – Wall Thickness Visualization and Fixing are just the start of more automated tools to help you find structural problems with your models as quickly as possible.
I tried this last night.. I really like where you guys are going with this.. i think is super impressive..
I have a hollow Mr. Putin “sculpture” that people wanted 3d printed in ceramic.. i tried this automatic wall fixing.. but the model faces were pushed outwards.. this made the model look really bad.. since the detail outside is what matters… if you guys could make it change direction specially for hollow models i think you guys would have a winner..
just to recap.. can you guys make a switch that redirects faces the opposite way.. where the faces get pushed inward for hollow models?
Yes, Yes, Yes.
all the time i used to read smaller content which also clear their motive, and
that is also happening with this piece of writing which I am reading
now.
such strange spam text!
is it supposed to to take hours to fix problems on models I tried it on a cat business card holder and it took too long I’m on fire fox I can only have one window to a website open at a time I gave up waiting for it to work as I wanted to upload another two models. it’s quicker to remove the problems manually admittedly it doesn’t look good a cat without ears I gave up on trying to fix it for sandstone and settled on what worked instead can you make the repairs engine work a little faster please
It’s pretty complex stuff but we’ll see what we can do to speed it up for you John!
Great first step. Can’t wait to see the next iteration.
Nice tool love it
Thanks for finally talking about >Shapeways launches Wall Thickness
Fixing for all models – Shapeways Blog on 3D Printing News & Innovation
hmmm… nice indeed 🙂
Very nice. Thanks for continually look at ways to streamline the process and help us get the items selling that we create.
Keep up the innovating.
Steven
Just wanted to commend the Shapeways team for making the process easier for its users? I am new…I contacted Shapeways just a few days ago for the first time and was answered extremely fast…I had also sent a question to another company and it took 4 days for a response…customer service and close connection to your user base, makes for a company I want to work with…..so Thanks for doing it right!
The new feature was very fast for me…The only thing I could say would be that it could be slightly smoother when adding to the mesh. I really liked Fernando ‘s idea of adding to the inner walls of a hollow mesh.
Awesome blog post, it’s always great to see you finding new and interesting was to allow us to create models that we can sell. More money for all 🙂
Hi all,
Very nice tool, but I have some problems. When I open the tool, I can’t see my model, even with Mozilla or IE.
Once downloaded the fixed model, I can open the original in my software (Rhino) but not the fixed one.
Some help?
Thank you!
Dario
Hi Dario,
When you download the fix, you should get three files together in a .zip, which will include the fixed file.
If you are still having problems, please feel free to contact us at service@shapeways.com
Thanks!
Natalia
Thanks Natalia! I will do it!
Cheers,
Dario
I used this tool for the first time yesterday and it worked great. Thanks to shapeways for continuing to implement technology to help us get our models uploaded and printable with as little frustration as possible.
This is great news, thanks guys.
I used this today (fixed the model myself though) It is a great advancement! Thank you soo much!